
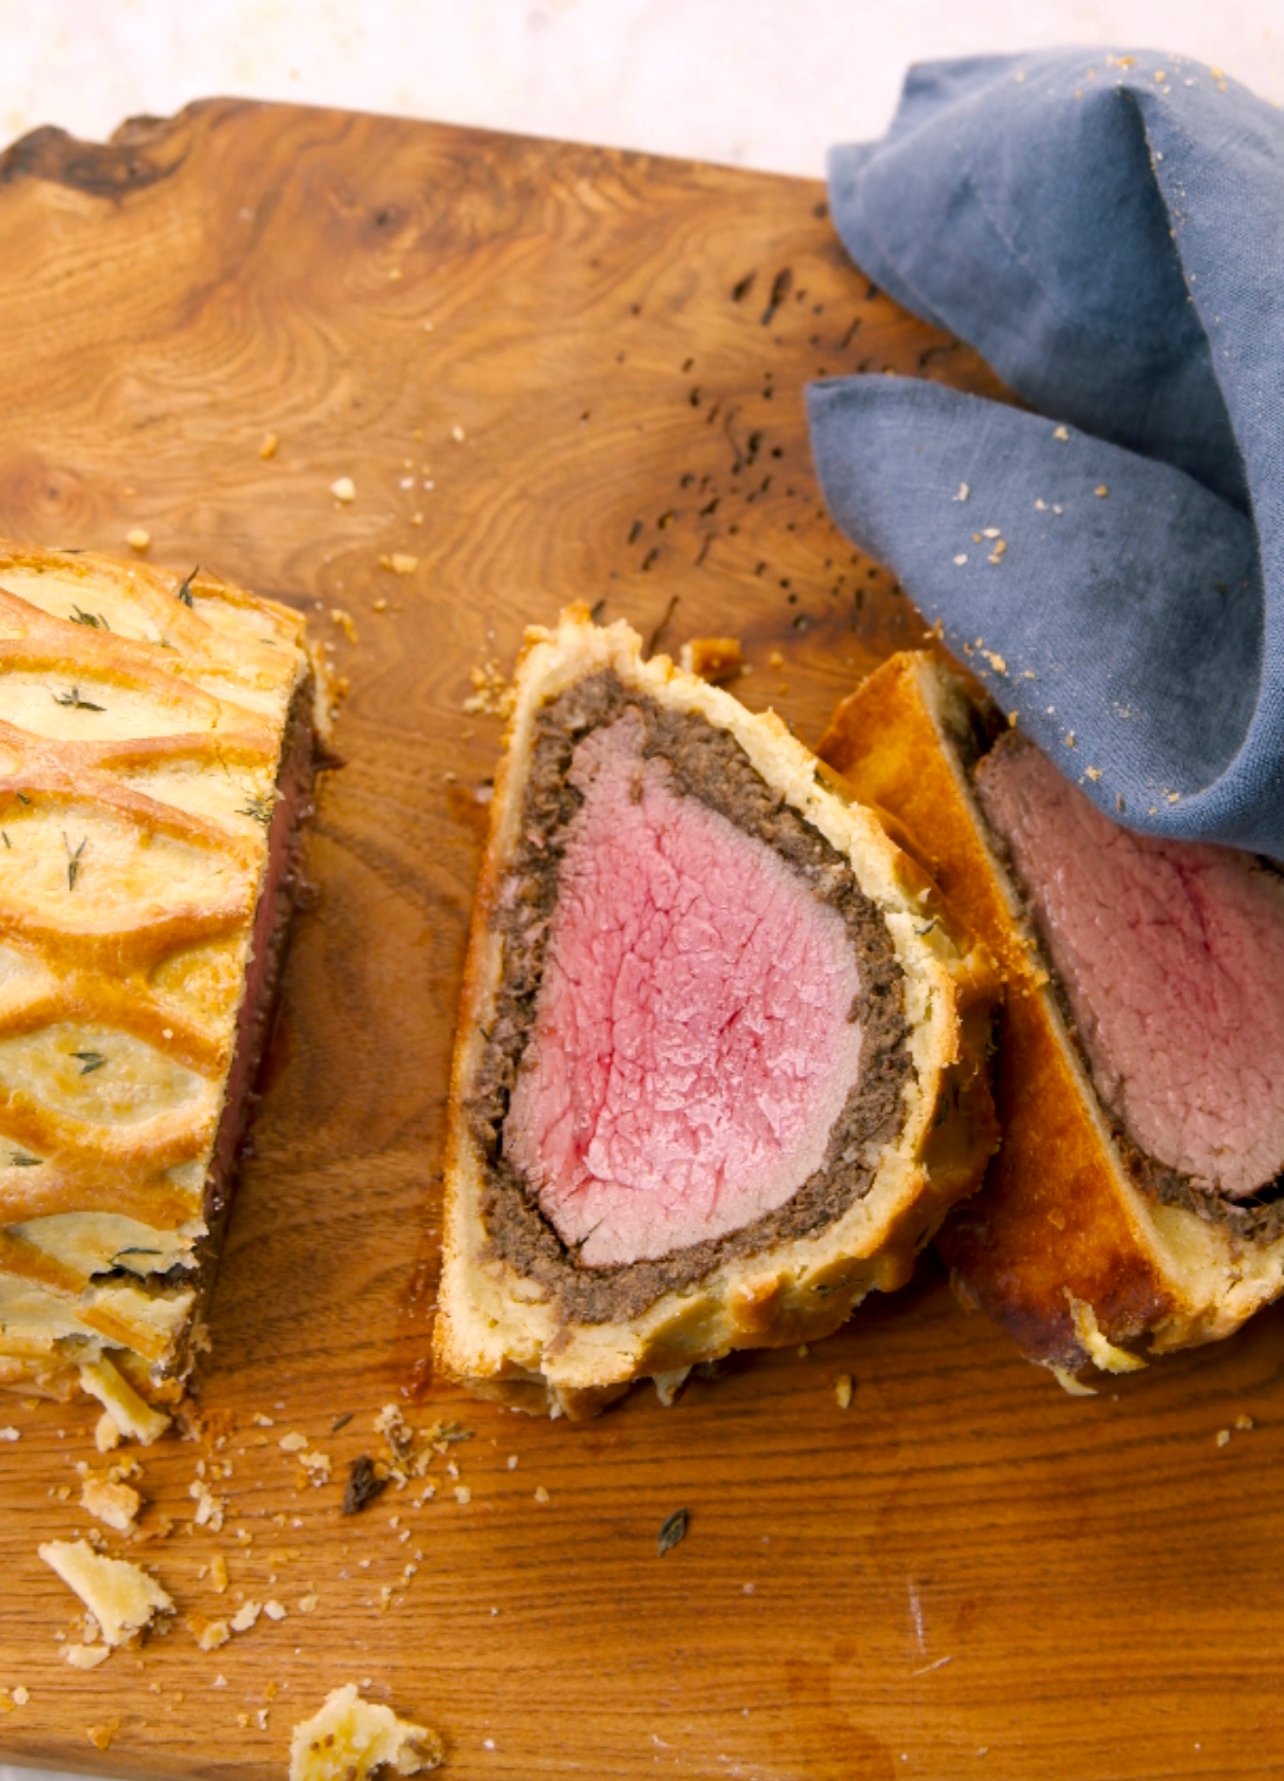
Bœuf Wellington Recipe

A bœuf wellington is not only a showcase of technique but also a form of craftsmanship.
But let’s be honest: it’s also a massive undertaking because there’s so many steps and it takes some skill and a lot of time! And while it might be a showstopper on the table, there are many things that can go wrong. But the end product makes it all worth it, especially as your friends and family ooh and ahh as you parade it to the table.
We’ve broken it down into two days to make it seem less overwhelming. Or you can just order one from us:)
Psst! Members get 10% off.
Day 1: Make the pate brisée, mushroom duxelles, & clean the beef
These instructions are for one large wellington that will feed about 8 people.
You can also break the tenderloin down to do individual wellingtons or for 2 people, etc.

Pate Brisée
makes 1 wellington — if you want to make a lattice, make a 2x batch
shopping list —
500 grams ap flour
250 grams cold butter
12 grams salt
30 grams sugar
2 eggs
65 grams cold milk
equipment —
robot coupe or food processor
whisk
bowl
steps —
Whisk the eggs and milk together.
In a food processor, pulse the flour, sugar, and salt together. Add the cold butter and pulse until the mixture resembles sand. (We’re not making pie dough with big butter chunks. You want the pate brisée to have some structure.)
Pulse in the egg/milk mixture until it the dough mostly comes together. Take the dough out of the food processor and knead until smooth (don’t over-knead). Wrap the dough in plastic wrap and rest in the refrigerator for a few hours or overnight.
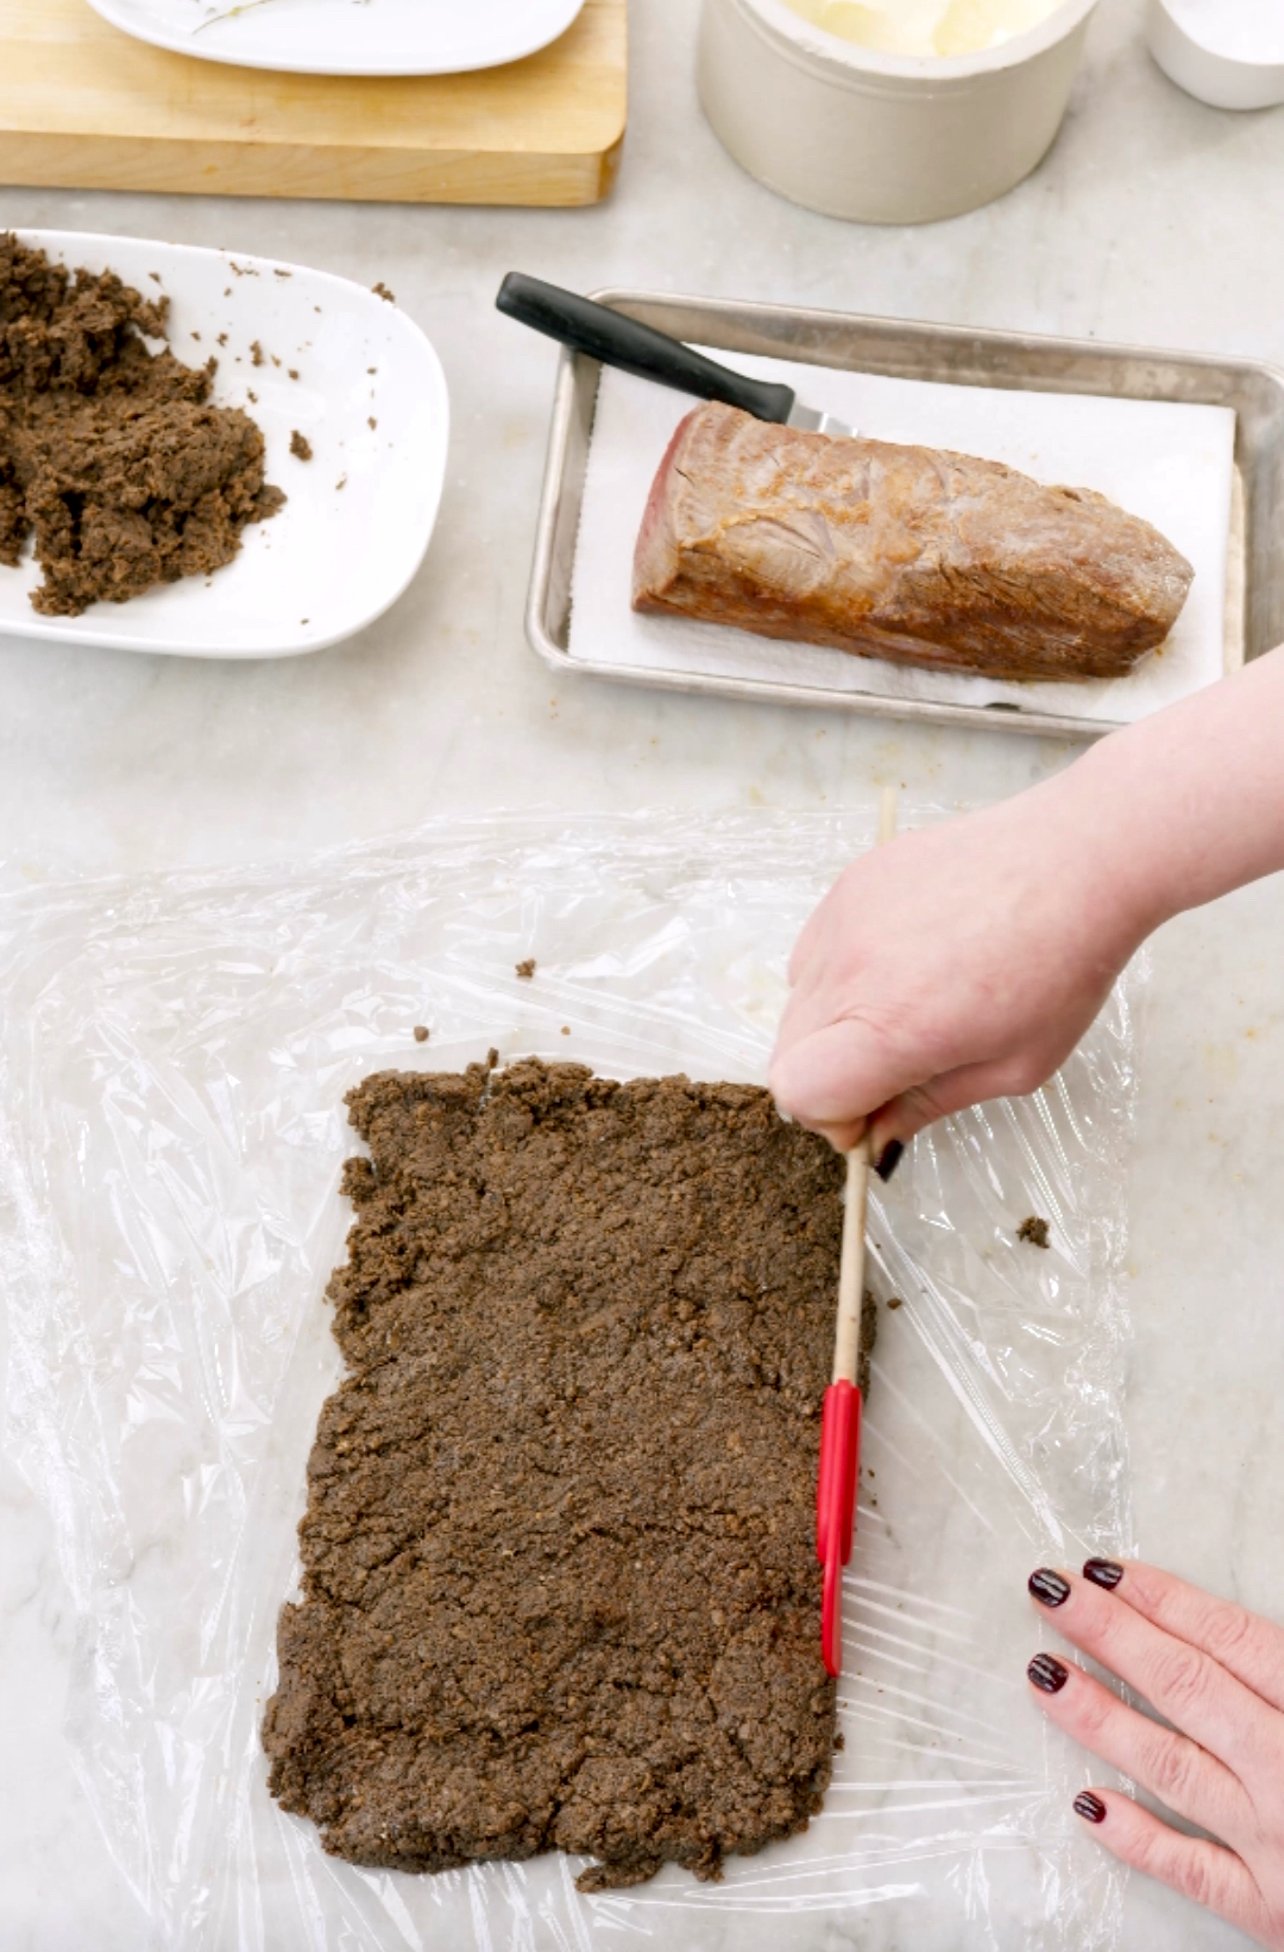
Mushroom Duxelles
makes 1 wellington
shopping list —
3# button mushrooms
2 ea shallots
1-2 tsp dijon mustard
sherry vinegar to taste
salt to taste
equipment —
meat grinder or food processor
cast iron pan, skillet, or saute pan
parchment-lined sheet tray
steps —
Clean the mushrooms to remove any substrate (stems are okay to leave on).
Grind the mushrooms and shallots through the meat grinder — feel free to grind right into the pan you’re using to cook them so you don’t have to clean another dish. Alternatively, you can pulse the mushrooms in a food processor until finely chopped and mince the shallots with a knife.
Start the pan over medium high heat. There’s going to be a lot of water that is going to start to cook out. Stir the mushrooms occasionally. Once the liquid has begun to evaporate, turn the heat down to medium low and cook until they’re dry and begin to stick to the bottom of the pan. Stir as often as needed to prevent them from burning but make sure to smooth out the mushrooms in one even layer after stirring.
Season the duxelles with a little dijon mustard, salt, a splash of sherry vinegar. Allow to cook for a few more minutes to cook out the moisture.
Remove the duxelles from the pan and onto a parchment lined sheet tray in one even layer. Place in the fridge to cool. (Be sure to leave a little room above the sheet tray for the mushrooms to cool. If the pan sits too close to a shelf or you stack something on top, all the condensation from the hot mushrooms will drip back into the duxelles.)

Clean the Tenderloin
makes 1 wellington or 4-5 individual wellingtons
shopping list —
1 whole tenderloin
equipment —
knife
cutting board
steps —
You’ll notice there’s a chain attached alongside the tenderloin, connected by some fat and silverskin. Pull it away from the tenderloin using your hands until you can’t pull it away anymore as it’s connected to meat. Take your knife and cut along the chain, removing it from the tenderloin. You can save this meat for stir fries, grind it for burgers, etc.
Strip off any fat that is on the outside of the tenderloin using your fingers. It should pull off easily.
There’s usually one area on the tenderloin with a lot of silver-skin. Using a boning knife, slide the tip of the blade just under the silver-skin and make a cut so you have a flap. Pick up that flap with one hand and pull the flap while you run the knife in the opposite direction to remove the silver-skin. Keep the blade as flat as possible to avoid cutting any excess meat. Keep doing this until the silver-skin is gone. You don’t necessarily need to remove all the fat on the tenderloin, but focus on removing that silver-skin as it’s tough.
There’s one more part to cut off at the fatter side of the tenderloin. You can once again pull it away from the main tenderloin and then follow the line, and trim it off. Save this for future purposes as well to make petit filets.
At this point, you could season it and sear it right away; but you’ll get a better sear if you let it sit uncovered in the refrigerator overnight to help dry out the meat, especially if it’s been sealed in plastic.
If you’re confused at any point with these instructions, pull up a YouTube video! There’s thousands online that make it really easy to do.
Day 2: Sear, Roll out the Pate Brisée, & Assemble the Wellington
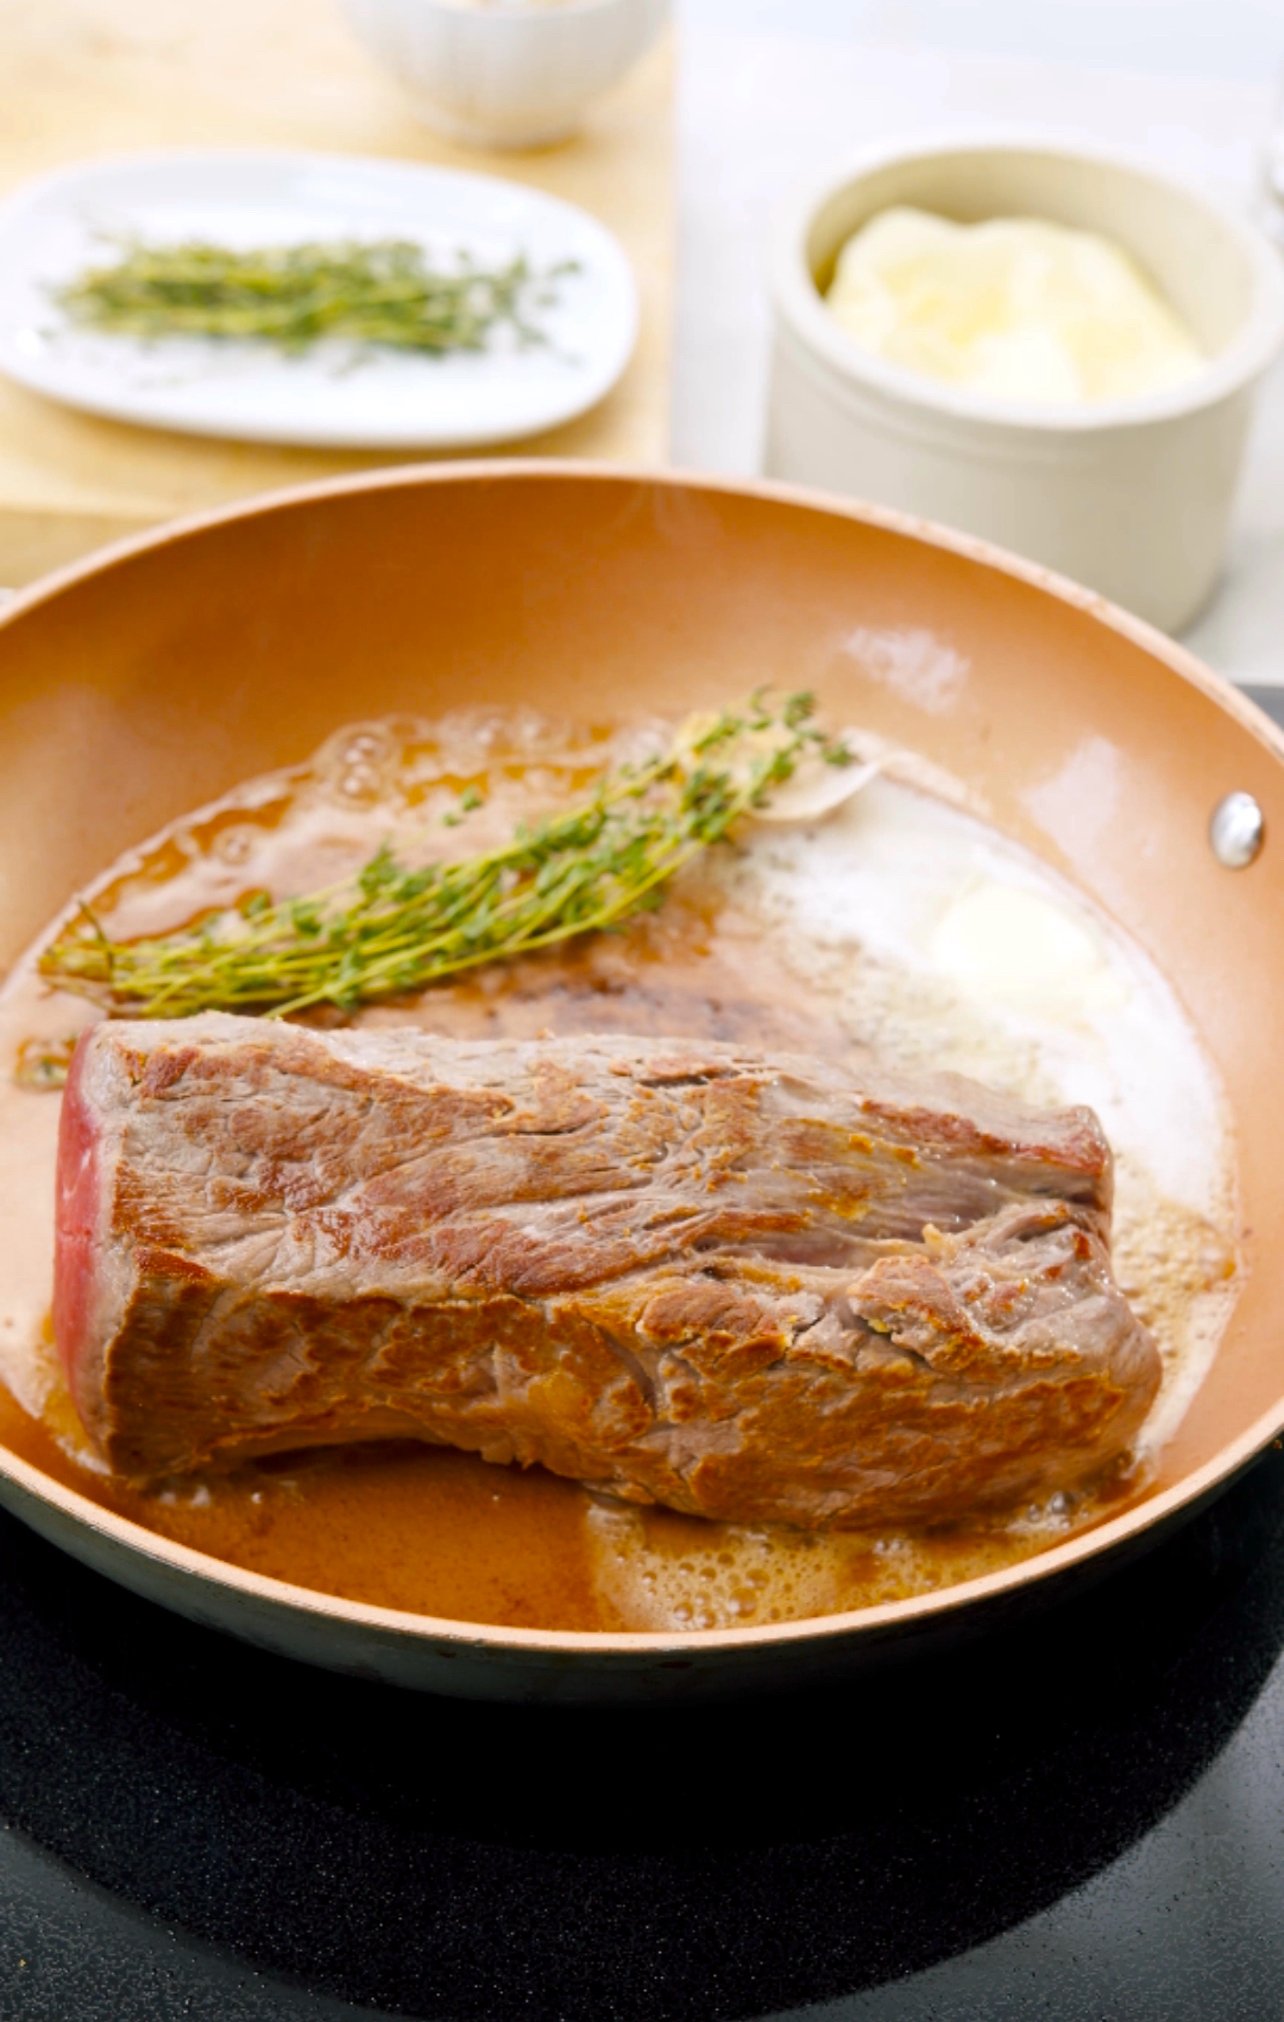
Sear the Tenderloin
Season the tenderloin all over with a good amount of salt.
In a hot pan with canola oil, sear the beef on all sides until golden brown. Remember, you’re searing, not cooking. The pan needs to be hot and it needs to be quick. Remove and allow to cool in the refrigerator, uncovered.
Once it’s cool, trim off the edges of the tenderloin.
Roll out the Pate Brisée
Allow the pate brisée to sit out at room temperature for 20 minutes to help you roll it out. Have a little flour on hand so the dough doesn’t stick.
Using a rolling pin or a large pasta roller, roll out the pate brisée until you get a large sheet about 1/8” thick. Refrigerate until ready to use. If rolling out more than one batch, layer the sheets between parchment paper.

Assemble the Wellington
You’ll need: 1-2 whole eggs, beaten — for an egg wash
Wipe the counter down with a damp towel. Lay down plastic wrap and smooth out. Lay out a thin even layer of duxelles that is the same size width as your tenderloin and triple in width. Roll the plastic wrap up and around the tenderloin so the duxelles evenly coats all the way around the tenderloin. Chill if time allows.
Pull out the rolled out pate brisée to room temperature again.
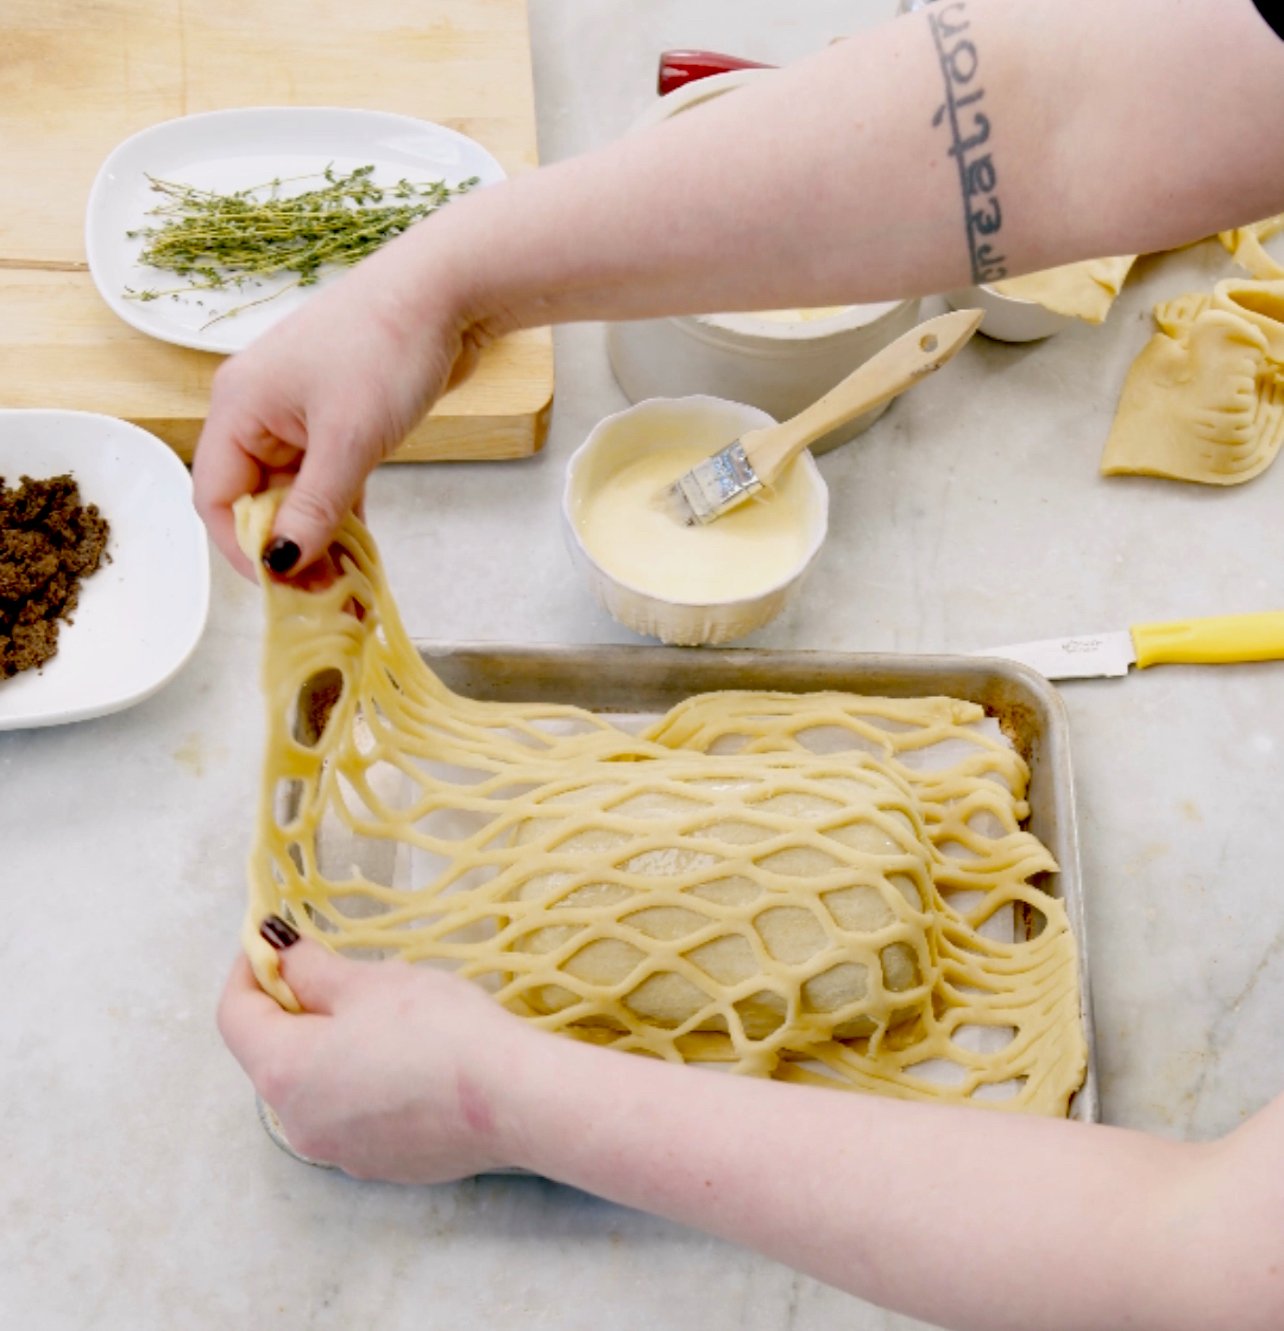
On a clean dry surface, lay out the pate brisée. Carefully unwrap your tenderloin onto the pate brisee. Fold the pate brisee around the wellington, trimming any excess dough. Brush 1-2” of the long edge with egg wash and seal the dough together. Trim off any excess dough around the two sides, brush with egg wash, and seal the sides - the seams should be on bottom.
Egg wash the dough*. Allow to rest on a parchment lined sheet tray in the refrigerator until you’re ready to bake.
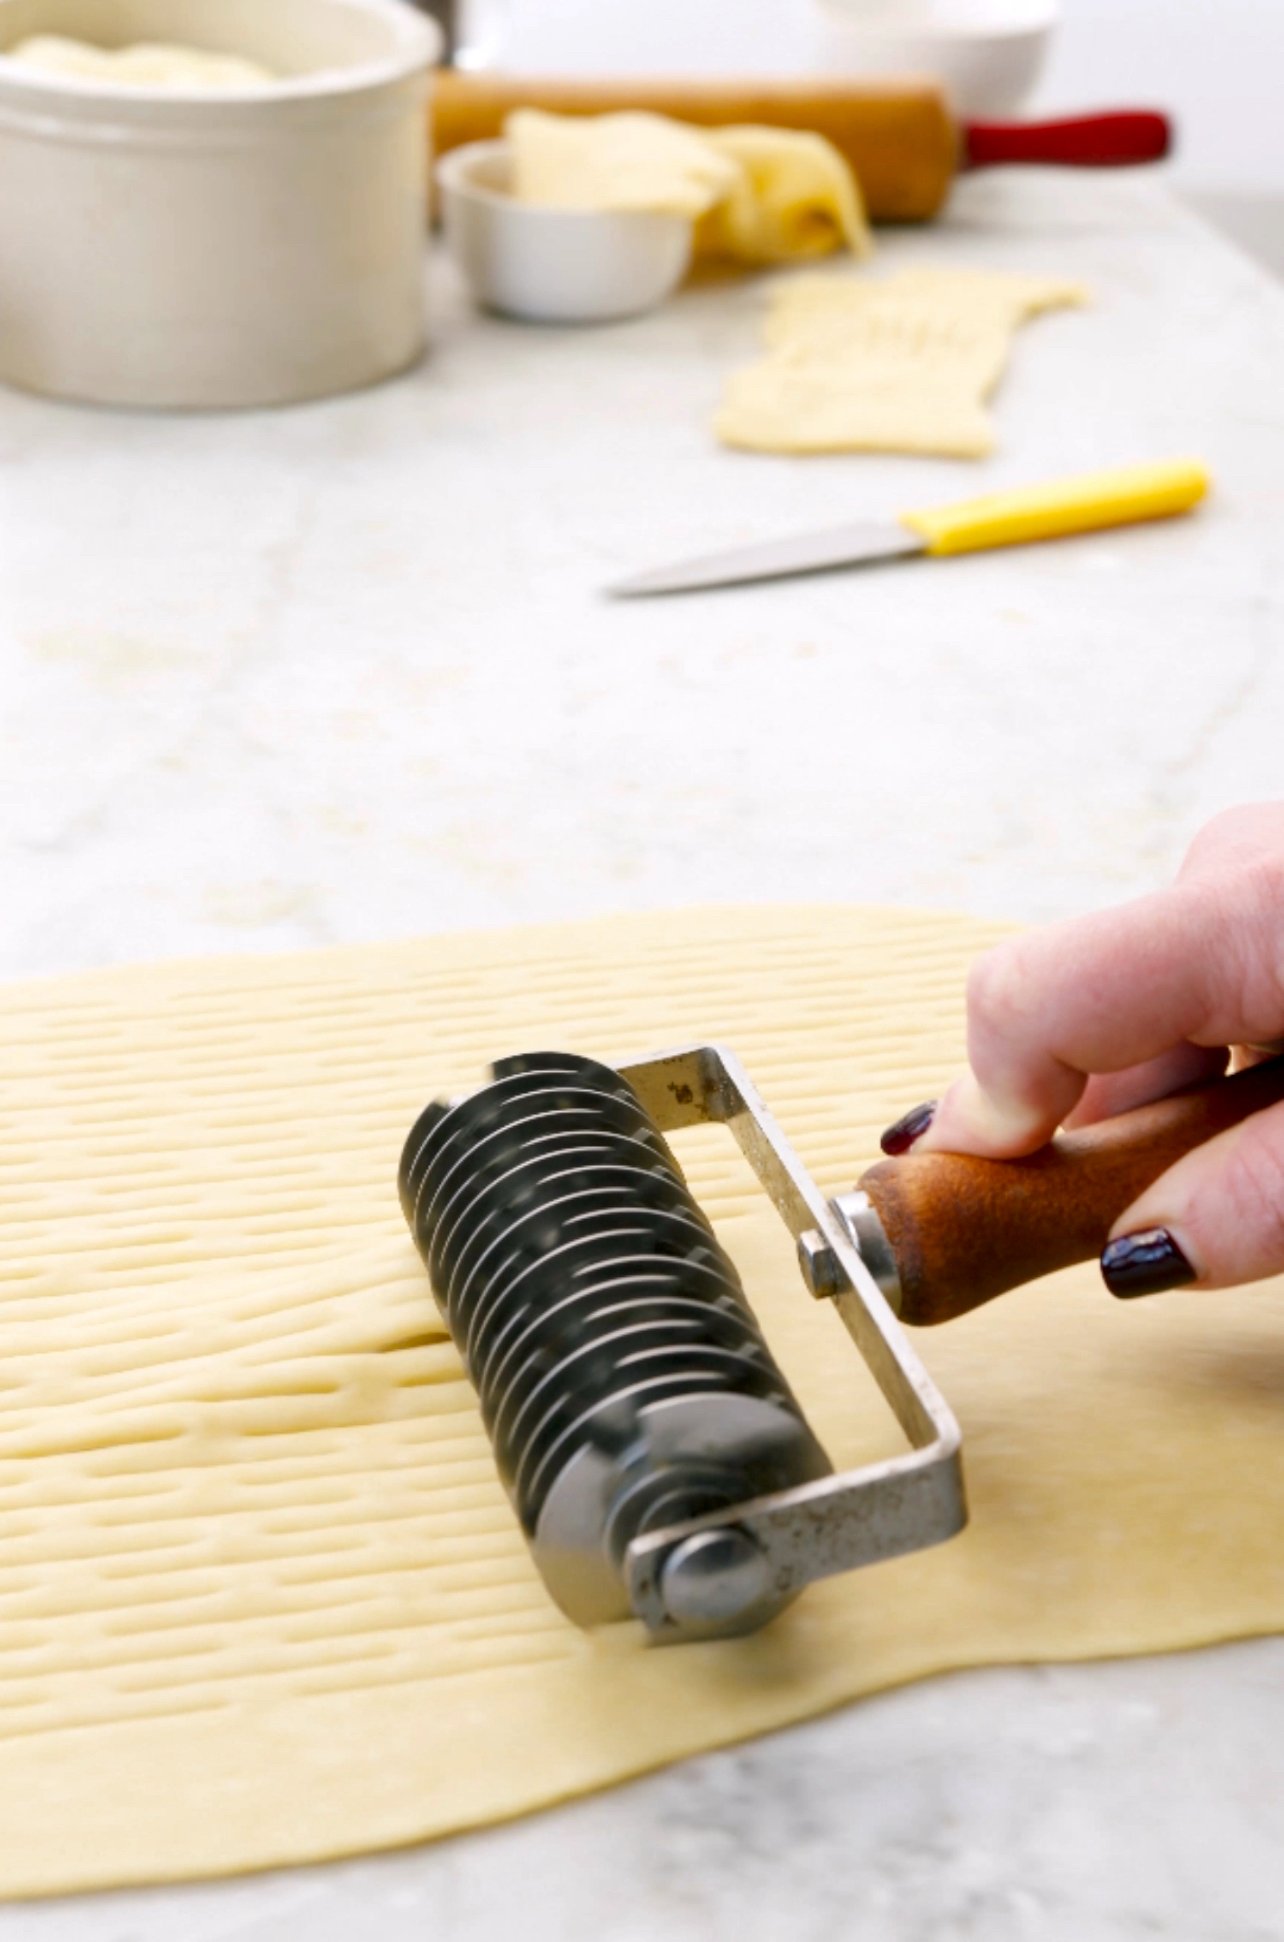
*You can also add a lattice. Lattice the dough, either using a lattice tool or a knife, and lay it gently over top of the egg washed wellington. Egg wash the lattice.
Cook the Wellington
Preheat the oven to 450ºF. Brush the wellington with egg wash one final time. Bake the wellington for 25-30 minutes or until the internal temp is 115ºF.
Allow to rest before slicing. For a larger wellington, the meat will continue to cook as it rests. If you start to notice that the temperature keeps climbing, you can always trim off the two sides so allow some heat to escape. Slice and serve.